Thursday, October 4, 2012

 Hap~PEA Birthday "PEA" J Party


A confession… Scooters actual birthday was months ago.  I had the party planned.  Most of the goodies purchased but I starting feeling sick.   Really sick.  I got up everyday, put a smile on my face and got through by a hair.  I couldn't quite get the energy I needed to put the party together.  Then we discovered the problem.  It was nothing major, but it did require a couple of surgeries to fix.  Finally after the surgeries and recuperation I felt like me again.  At this time it was the beginning of August and I decided to spend more quality, not sick anymore, time with my littles before they headed back to school.  As well it appears a small tornado had dropped right into the middle of my home.  It's amazing what happens to a home when Mom is sick.  So as soon as school started up again, and we could see the floor again, I jumped into party planning mode.  And finally… we had her birthday party.  I'm so grateful she is patient with her mommy.  I'm also glad I didn't shy away from finishing it just because time had passed.  We had so much fun!
A while back I posted my daughters 
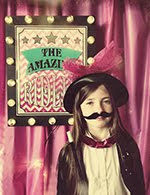
My oldest daughter expressed how much she wanted a P.J. party for a birthday.  She also wanted to use the Bed Table.  That's when this idea was born.  I secretly love the idea too.  Simply because she turned 10, and I know pretty soon the days of princesses will be gone.  They will be replaced with boy bands, fashion, head phones and text messages Sniff.   
I want to keep her young as long as I can.
Ahem... no I don't live on "Happy Lane".  My daughters name isn't really Scooter either, that's a nickname. :)  I changed this one for blogging purposes.
The inside read
Hear ye Hear ye
You are cordially invited to attend a...
Hap"Pea" Birthday
"Pea" J Party
Honoring
Princess Scooter
Your presence is requested at the 
Snow Castle
1234 Happy Lane
Saturday the 22nd of September
From 6:00 until 8:30 p.m.
R.S.V.P.
Pretty "Peas"
Wear your "Pea"J's!

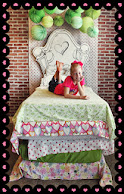
So this is literally 5 twin mattresses/box springs stacked on top of each other.  (We raided all of the beds in the house).  I made sure the bottom mattress was a heavy box spring. The top mattress is a box spring as well, but it was pretty light weight.  We added a piece of particle board on top of it.  It gave it a solid flat surface for the plates and such. It was actually quite stable.  We didn't let the kids go climbing on it or anything.  I was a little worried that the girls wouldn't like standing around the table as opposed to sitting.  But they loved it. I think they enjoyed it because it was so different from the norm.  Standing to eat, their food on a bed!  Cute girls.
It's nice to be able to use something I've already made in another party.  Who knows where else the headboard will show up.
My husband is such a good sport.  I'm so grateful for a guy that just smiles when I say 
"So, ummm, I have this idea…"  
He was so helpful in moving all of the furniture for me.  Thanks hun.
I hung Martha Stewart Green accordion lanterns as a fun detail above the bed.


The Cake  
I made a little cake topper that say's "Pea"ce of cake on it.  And of course the inside had to be filled with "peas."  I used my polka dot cake technique to get the affect. Here is a link to the tutorial.
It was hilarious.  The girls literally gasped when I cut it open.  One little girl said "Oh no, I forgot my phone, can you take a photo for my mom."  She loves to bake, and was pretty impressed with it. 
 
We also had "Sugar Peas"! Cake balls dipped in green candy melts.  Topped with sanding sugar.
The Stewarts key lime sodas were labeled Slee-"Pea" Potion.  
I trimmed the edges with this Martha Stewart scallop edger punch
The straws had Zzzzz flags attached to  them.
Then for the ice cream… I made these little crown wraps to fit around these little dessert cups.  I picked mine up from walmart for $1.98 a piece.  Here is a link to purchase them on Amazon.  Then we filled them with lime sherbet.  I used a melon baller before hand to make the sherbet into "peas" (I stored them in ziplock baggies and then poured them into the dishes when it was serving time).  And p.s. pouring the Stewarts key lime soda on top (the Slee"Pea" potion) of the sherbet was a hit.  
They were like little lime floats.  Yummers.
Hap~Pea Birthday Banner
 Shhhhh Banner on the door to welcome the guests. 
I wrote a little poem and had it printed up.

Tuck me in and turn out the light.
Sing songs, then kiss me goodnight.

Another glass of water, a trip to the loo.
Sadly none of these attempts will do.

I'll toss and squirm and kick and fight.
It really isn't that late tonight.

For try as I will, I can't sleep you see.
It's not my fault, it's the princess in me!

It looked sweet on the party favor display.
Our activities…
I divided the girls into three groups.  
Then we rotated each group from activity to activity.
Twinkle Toes~ Painted glitter toes on the girls
Princess Slippers~  We decorated flip flops with fabric strips.
Sleeping Queens~ A cute card game we played.  You can find it here… Sleeping Queens.

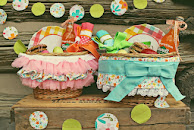
I snagged these green ball favor containers from Party City.  
Here is a link Green Party Favor Balls.
I sprayed (the green side) with spray adhesive, added green glitter, and sealed it with a clear gloss top coat (to keep the glitter from getting everywhere).
 Then I filled them with all sorts of round green candies, added ribbon and a "Sweet Pea" tag. 

I made each girl a small pillow & sleeping mask.  
I was going to make blankets… but honestly I found these at Ikea and it was worth it to just purchase them.  I added a paper crown that wrapped around each blanket.  
The girls were over the moon with their favors.  They were talking about putting the blanket and pillow on their bed, picking out the pillow that would best match their room decor.  Honestly, Scooter has such cutie pie friends.  I loved having them over. 

 I learned my lesson from the night owl party.  This time I have everything available as printable downloads in my etsy shop now.  Last time I kept you waiting… oops.  
Here is the link…  
Sweet Dreams!
anj.

Tuesday, September 25, 2012

 Supercalifragilisticexpialidocious


I've been planning our Halloween costumes this year.  We always try to have a matching theme as a family.  We've done Alice in Wonderland, Nightmare Before Christmas, The Snow Carny, The 50's and I'm sure there are more (my brain is shot, I've had 2 kids and a husband with strep throat, and I can feel myself getting sick as I type.  
Who knew fingers could weigh 5 pounds each).  
It's funny how much my kids love dressing up as a family.  I know the year will come when one of them will finally protest.  But a couple weeks back my girls both came to me asking what "WE" were going to be for halloween this year.  
I love it.

So if you're looking for a costume idea here is what we did last year…
K… I'm going to admit something.  Most young girls have crushes on the Justin Beiber's of their day.  I had a crush on… I'm almost embarrassed to admit this, but it's the truth. 

Dick Van Dyke. 

Yep.

No lie.  
My dad owned a video store, one of the first in our town.  Back then you had to rent the movie and then the 50 pound VCR just so you could watch the video.  
It was called Video Express.
I still remember adding the "be kind rewind" stickers onto the tapes, (most of the stickers made it onto my clothing and face rather than the videos) and helping myself to the candy and soda pop in the store.   I also remember thinking the teenage employees were soooo cool.  There was particular girl with long gorgeous blond hair who would wear it in a side pony tail that twisted.  
I felt "like, oh my gosh, so totally rad" when my mom would do my hair like hers.
(I still remember when she came to our house and taught my mom how to do this hairstyle on me.  I felt so special).
One of the first "kid" videos he purchased was 
Chitty Chitty Bang Bang.  
We would watch it over and over.  Perhaps that's where it all started.  But man, I thought (and still think) Mr. Van Dyke was darling.  Now the funny thing is… I kind of married him.  
People who know J will laugh in agreement.  
J walking around dressed as Bert, interpreting his gait and attempting that cockney english accent was perfection. 
He honestly could have gotten a job at disneyland.  

Then we have…

A bit of a stretch, but it works.
I found this pattern for the wings 
The skirts & masks I just made up on my own. And then there is me as...
 I had the coat.  The hat is a bowler hat (from a costume store).  I beat it up, added a few staples here and there and then glued on the flowers and cherries.  The umbrella was the only big halloween costume purchase of the lot.  I got it at the Disney store.

Now if only I could snap my fingers to clean the house.  (Although I don't know if I could manage to snap… remember, they feel like they weigh 5 pounds each).
Halloween… such a jolly holiday! 

Wednesday, September 12, 2012

 Mr. Copperpot


There is a chill in the air! 
I have to slip on socks first thing out of bed to warm my froze toes.   We open our windows on friday nights to listen to the high school kids cheering at the football games.  (We know if they are winning or not just by how loud they get).  The kids are back in school, wearing sweaters and jackets that are clearly not needed yet… but they like to layer as much as their mommy does. Night is creeping up earlier and earlier.  And I get all giddy.  
Fall is here!

I debate it every year… how early is too early to set up halloween?  I seriously can't help myself.  
This post is a halloween decoration I've had for a couple years now.  Don't worry, these photo's are from last year…. I have not set him up yet.  
Soon though… very soon.

In the two times I've been to Disneyland in the last decade I've made sure that we go when the Nightmare Before Christmas is set up at The Haunted Mansion.  If you know me, you know I'm a fan of Mr. Burton and his crazy dark artsy-ness.  I wish I could just magically decorate my house like the mansion for halloween.  Alas I have not the funds or enough waking hours to attempt it. :)

On the outside of the mansion it's decorated with all of these fabulous cartoony skulls.  They are both a tad creepy and a bit comical & dopy at the same time.  I know, it sounds weird, but it works.
I wanted to add my own.  Instead of making several small skulls (as they have on the Haunted Mansion) I made one very large skull.  
Here is Momo next to him.  He's not small, he measures about 4.5 x 3 feet. My husband often states that my motto is "Go big or go home".  As much as I'd like to say it's not true, 
I think he might be very very correct. 
I painted him on masonite.  My neighbor who is always coming to my… "help me I need to build something" rescue cut him out with his jigsaw.  
(For the love, I need to finally just purchase a jigsaw). 
After the skull was painted and dry I added a coat of matte varnish (just from a spray can).  I think this will be the third year (maybe forth) we've put him up.  
He has made it through wind, rain & snow.  
He still looks good as new.
I love putting him up every year.  He makes me smile every time I pull into the driveway.


Perhaps I should name him.  
Any thoughts on a good name????
Maybe I'll call him Chester Copperpot.

K, before the skull was drawn and painted onto the masonite, I first sketched him out on paper.  Here is the drawing… you're welcome to use it if you'd like.  If you have a projector you could shine him up on your own board and make your own. :)  I can't give painting lessons though… that would be a bit too intense of a tutorial. 
Again… it's just the rough sketch, not a masterpiece or anything.  Be forgiving, at least I cut off the grocery list I had written on the bottom of the paper. 
Although, I believe it still carries the creases from where I sat on this grocery list because I left it on the front seat of the car.  Ooops.

And yes… I'm listening to my Halloween soundtrack while I write this post.  
Here is what's on  my soundtrack (incase your looking for some music to add to your own)…
Corpse Bride Soundtrack
Coraline Soundtrack
(End Credits & The Supper)
Nightmare Before Christmas Soundtrack
A few Harry Potter Favorites
 Dementors in the Underpass (Order of the Phoenix), Double Trouble (Azkaban), 
Story Continues (Goblet of Fire) & Finale (Azkaban)
Beetlejuice Soundtrack 
(a few select songs)
Edward Scissorhands
(Ice Dance, The Cookie Factory & The End)
Tales from the Crypt 
Danny Elfman is 90% of my soundtrack.  
Sure beats listening to The Monster Mash… (although it was a graveyard smash).  
Just thinking about that song gives me a headache.  

Happy Fall All!

Friday, August 31, 2012

 Fabric Roses... without the stems!


I've had a few people ask me if it's possible to make my long stemmed fabric roses  and omit the stem.  That way you have a lovely rose you could use as a super darling hair clip or brooch.
Well certainly you can!  
I make them all the time, and have been ever since I started making those long stemmed beauties.  
Now here is the thing…  You can hit the mall and pick up a hair flower for about 5 bucks.  So this project isn't for everyone.  However, these work great when I need a rose in a specific color.  Or when I've sewn a skirt for my girls and want a hair piece to match. I think they would also be fun for cheer squads, or when you're just a spectator but need to wear the appropriate team colors to a game.  I'm sure you could come up with more ideas than me… I've been editing these photo's and writing this tutorial for the last 5 million hours (I'm positive it's been at LEAST that long). 
My brain is working at a slllloooowww crawl. 

I've made these roses in two "styles".  
One style is with just one strip of fabric.  
And the other (I admit I do it this way more often) 
with an extra sheer piece of fabric.
(My daughter in the photo above is wearing this style). 
If you want to do it this way, you'll need fabric that won't fray too much when you cut it.  I use what is called Nylon Chiffon It's the same fabric they use to make those fabulous pettiskirts.  I purchased mine in the 5 inch width rolls… that way I don't have to do a lot of cutting.
Alrighty… let's get started.  If you've made the long stemmed flowers, this will be very familiar to you! (If not, just ignore the many times I refer back to them).
1. Cut your fabric (selvage to selvage) in 5" strips.  (approximately 5"x 45" long strips).

2. Fold strips in half lengthwise (wrong sides together) and press. Your strip is now 2.5" x 45-ish"

3. Trim off selvage edges (finished edges).

4.  Now to cut the petals.  Scallop the open ends of the strip.  Each scallop is approximately 2.5 inches.  If you make a small mark at the open end every 2.5 inches it will help guide you as you cut.
Hint…. To make things easier, I cut out one and keep it as a template to make all my other roses.  I simply take my template and place it on top of another strip and use it as a pattern to cut the scalloped edge.  These don't need to be "perfect."
5. Now on my stemmed rose pattern, I have you leave a "tail".  On this one we don't do that.  For your last three scallops or so (only on one end), make them taper down in both height and width. (You want it to look like the top strip of fabric, not the bottom one in the photo).


6.Now to cut the optional sheer fabric.  
Cut a 5 inch strip the same length of the printed fabric strip.  Just like the other one, fold in half lengthwise.  
Now because this fabric is so thin there is a quicker way to scallop it.
Fold the fabric back and forth on top of itself at about 2.5 inches. Like an accordion.  Once it is all folded, trim the top (open edge) in a half circle.  Open it up… and voilà… you have a lovely scalloped strip of fabric.  (This trick won't work on the printed fabric… It's just too thick and the scallops end up looking messy).  
Then repeat the same thing we did on the other strip and taper the last few scallops by simply trimming them down a bit.

7.Now sew the open ends (scalloped edges) together on the printed fabric.
8. Next place them on top of each other.  
Make folded edges at the bottom even.  Don't worry if the scallops don't line up… I actually prefer that they don't. 
9. Now we sew the two pieces together with a gathering stitch.  You can do two gathering stitches parallel to each other if you are worried about the thread breaking.  You also can use a gathering foot if you've got one! (You don't need to open up the fabric and stitch down the center like on my stemmed flowers.  
In the end the stitches will be hidden under a piece of felt… so it doesn't need to look pretty).  I stitched my gathering stitch 1/8th of an inch from the bottom.

10. Now gather the fabric… I take my time on this step, and I'm super delicate with the thread so I don't break it.
And there is the gathered piece.
11. Now if you used two fabrics you have a choice to make.  Roll the gathered strip up into a rose. First with the sheer fabric side up (left photo) and then roll it again with your patterned fabric side up (right photo).  The look changes, so decide which way you like it before you move on to the next step! 
12. Alrighty… let's sew the rose together.  Start rolling in the end with the tapered scallops.  Make sure you have your favorite side up (or facing in).  With a needle and thread stitch through the layers at the bottom of the rose.  I like to go in where the gathering stitch is.  Wrap a bit more of the fabric, stitch through all the rolled layers again… and repeat and repeat and repeat.
You may get to a point where the needle is having a hard time stitching through all the layers.  If this happens bring the needle only to the center of your rose.  Then stitch back out from the center to the outside again.  Continue doing this until you've finished.
13. Sew a knot at the end, cut any excess thread and there it is.
14. Now attach a two inch round cut of felt with your preferred adhesive. (I use a hot glue gun).  If you want to get all fancy pants, you can do a blanket stitch around the edge of the felt.  It will give it a professional finished look.  
(I'm not that fancy, or professional).

15. Then attach the clip of your choice.  I used a Dual Brooch Pin Back Base, that way it can be a hair piece or a brooch!  Everyone wins!  
And you're all done! 
Momo was my little helper.  He colored up on the counter while I cut, sewed and photographed.  We also almost became victims of THEE most aggressive fly I've ever encountered!  I swear it pummeled my face no less that 20 times.  I'd love to say no one was harmed during the making of this tutorial… but that fly had it coming!  
(I'm sure you all wanted to know that).

These roses are statement pieces! 
They are not petite.  
The finished rose measures about 5 inches in diameter.   
Here is another one. I made this rose for Ride's Easter outfit… two Easters ago.  (I used the same fabric for her Easter skirt).  
Ahem…I really really really should have made this post back then.  It was the original plan. I even had the photo's and everything.  
But I took a blogging break. 
I'll explain my disappearance in an upcoming post. 
Scooter and I went out and had a ball taking some "modeling" pics of the fabric rose.  
We got a little carried away.  
We did a "back to school" shoot.  
Good times!


Love this girl!